Installation & Help Wiki
DingDuff is a legal-research connector for Claude. It links your own Claude account to a database of millions of court opinions, federal and state statutes and rules, and federal court filings (PACER) — so you can do real legal research right inside Claude, with citations.
DingDuff is listed in Claude’s connectors directory, so adding it takes about a minute: find DingDuff in the directory, click add, sign in.
This wiki is written so you can either read it yourself or point Claude at it and ask Claude to walk you through everything. The easiest path:
Open Claude, paste the link to this page, and say: “Walk me through installing DingDuff, one step at a time.”
1Install DingDuff+
Before you start
DingDuff itself is free. To use it you need two things:
- A DingDuff login — sign up at dingduff.com to create your account. This gives you the email + password you’ll use when connecting. DingDuff is for licensed attorneys (per the Terms of Service).
- Your own Claude account — a paid plan (Pro, Max, Team, or Enterprise) is recommended. The Claude desktop app with Cowork mode is the best experience; a web browser also works (see Browser Setup).
Create the DingDuff account first at dingduff.com (click Sign Up). Step 2 asks you to sign in with it, so having it ready keeps the install to one pass.
Install DingDuff
DingDuff is listed in Claude’s connectors directory, so there is no URL to paste — you find DingDuff in the directory and click add.
Step 1 — Sign up at dingduff.com
Go to dingduff.com, click Sign Up, and create your account. Keep that email and password handy.
Step 2 — Add DingDuff from Claude’s connector directory
The quick way — open the DingDuff listing and click the add button:
Open the DingDuff listing in Claude’s directory ↗
Or find it inside Claude:
- In Claude, open Customize from the left sidebar (in a browser this may be under Settings), then go to Connectors.
- Click the + button, then choose Browse connectors. The Directory opens.
- Make sure Connectors is selected on the left, then type DingDuff in the search box.
- On the DingDuff card, click the + to add it.
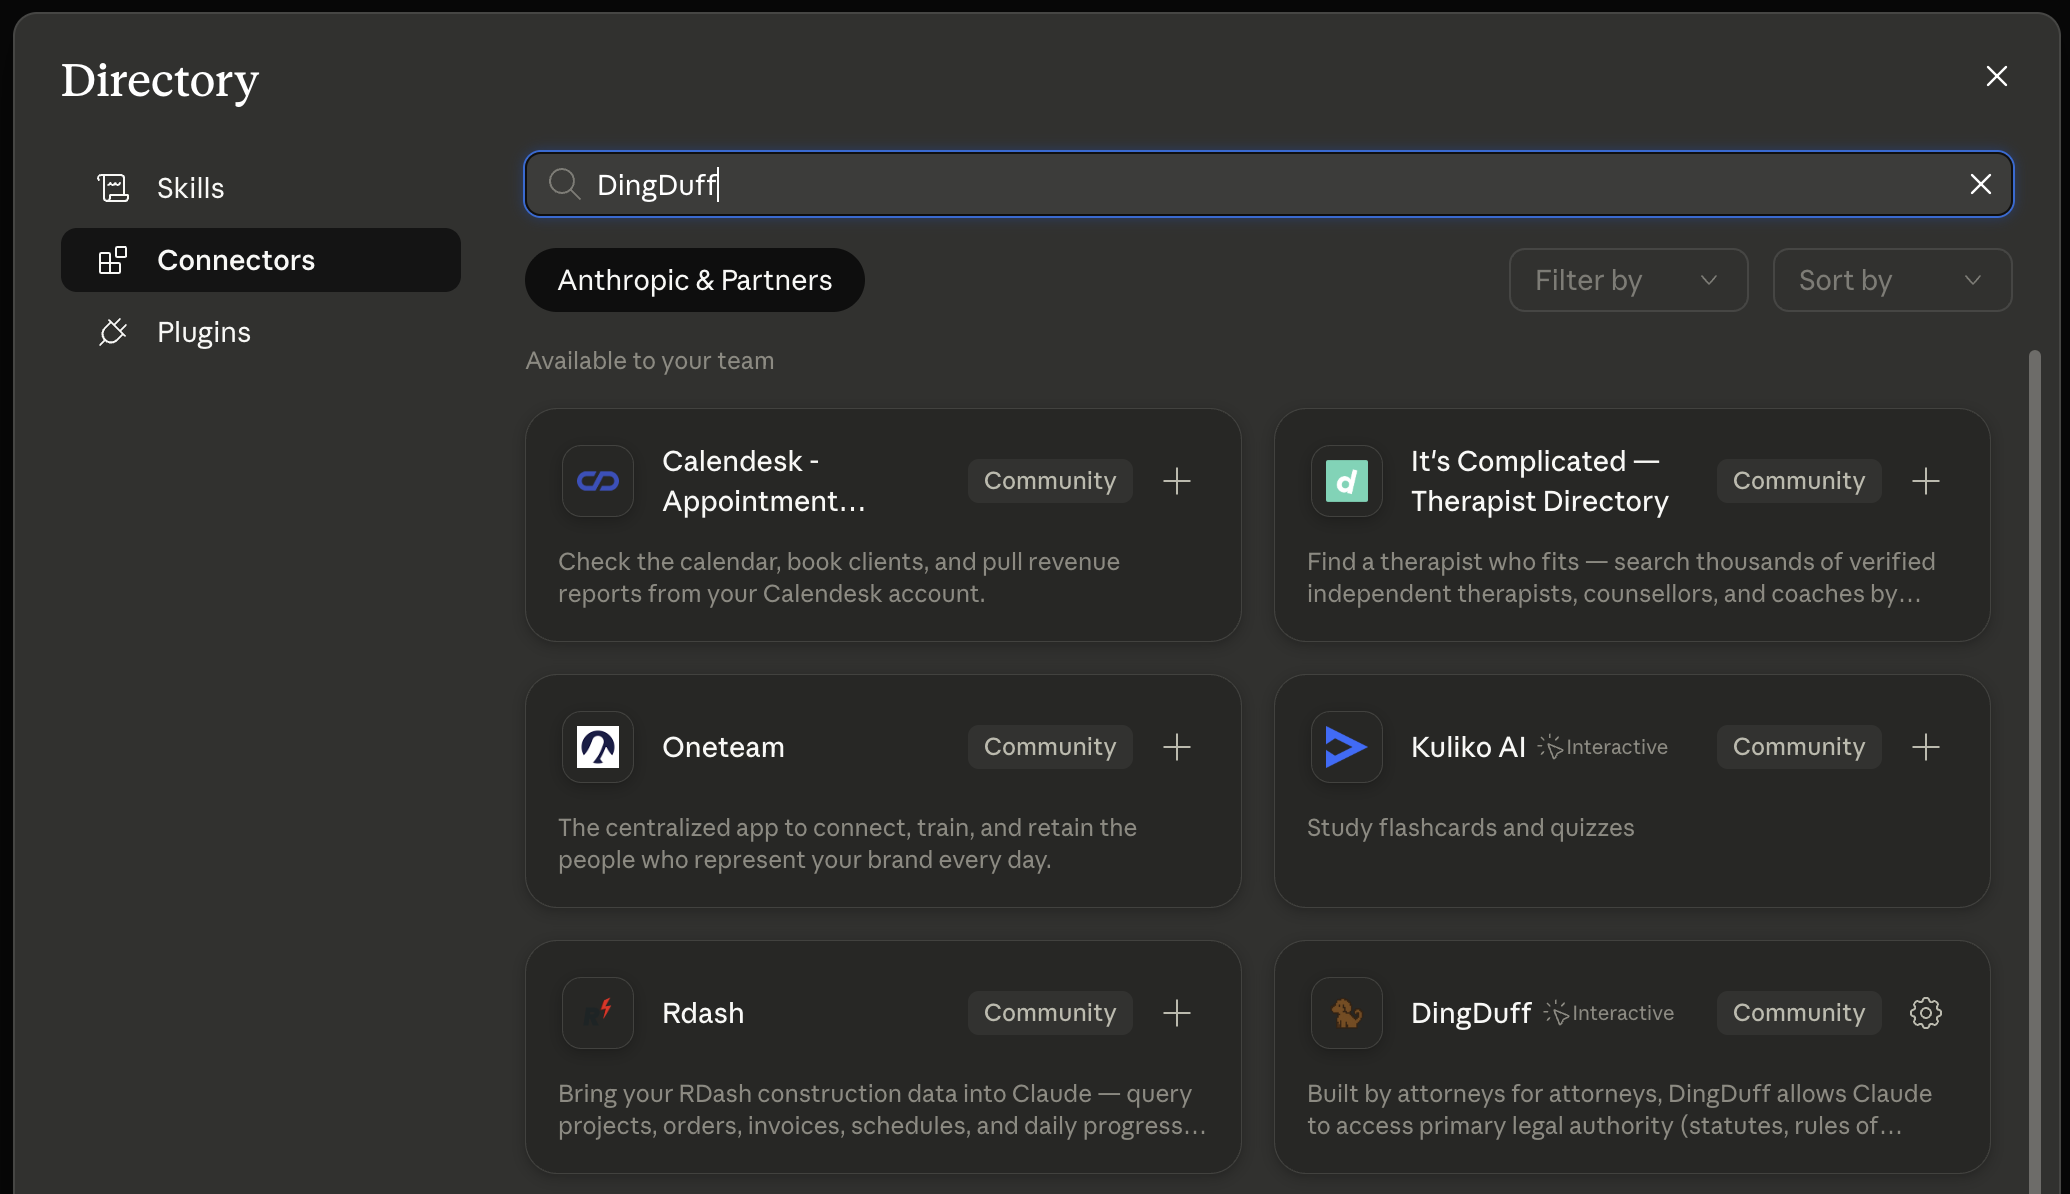
Either way, Claude then sends you to the DingDuff sign-in page. Enter the email and password for the account you created in Step 1 and approve the connection. You’ll be returned to Claude automatically.
DingDuff is labeled a Community connector in the directory — it passed Anthropic’s automated checks for the directory but wasn’t individually reviewed by Anthropic. It works exactly like any other directory connector once connected.
A small browser/login window normally opens for sign-in. If nothing appears, see “Sign-in window doesn’t open” in Troubleshooting.
On a Team plan you may see Request instead of an add button — that means your admin controls connectors. Click it and see Team & Enterprise.
Step 3 — Allow DingDuff’s tools
After connecting, DingDuff appears in your connector list with its tools. We recommend setting each tool to always allow (the checkmark, not the hand icon) so you aren’t asked for permission on every research request.
Step 4 — Confirm it works
In a chat, ask Claude: “Does the DingDuff connector have the
opinion_search tool?”
If yes, the connector is working. Now try a real query, e.g.: “Using only DingDuff, find recent Texas appellate cases on the economic loss rule and give me citations.”
BYOK / API Key (Legacy)
Most users don’t need this — skip it unless you’re in a locked-down environment.
DingDuff works best when Claude can save the full text of a case or
statute to your working folder with fetch_opinion_file /
fetch_statute_file and read the actual source. That needs
Claude’s code-execution environment with network access turned on
(Settings → Capabilities → Code execution
and file creation + Allow network egress; the desktop Cowork app
already has it — see
Browser Setup).
The BYOK (bring-your-own-key) path is for when you
can’t turn those settings on — e.g. a corporate
Team / Enterprise account whose admin won’t enable code execution
or network egress. Without those, the store tools can’t download
files, so instead you add your own Anthropic API key to your DingDuff
profile. That unlocks three tools that run on DingDuff’s back end
— opinion_extract,
submit_batch_screen, and
retrieve_batch_screen — which hand Claude focused
excerpts of the relevant material, so it can read what matters without
downloading anything and without flooding the chat with full opinions.
Which one applies to you?
-
You can change Claude’s settings (most
Pro/Max users; Cowork desktop) → turn on code execution +
network egress and use
fetch_opinion_file/fetch_statute_file. Better results, no key needed. Skip BYOK. -
You can’t change those settings (locked-down
work account) → set up BYOK:
- Get an Anthropic API key from the Claude Console — add a payment method and create a key (ask Claude to walk you through it).
- Log in to your profile on dingduff.com and paste the key in.
- Use a dedicated key and turn off auto-reload (required by our Terms).
Cost is small — typically a few dollars a month, billed by Anthropic, not DingDuff.
Recommended settings (optional but worth it)
These take a few minutes and noticeably improve results. Full details on Skills & Settings:
- Install the dingduff-legal-research skill
- Install the dingduff-legal-analysis skill
- Install the dingduff-citation-check skill
- Add a custom instruction (Profile → Instructions for Claude) telling Claude to always use DingDuff for legal research
- Turn off chat training in your Claude privacy settings
Using DingDuff on mobile
You can add the DingDuff connector on the Claude mobile apps the same way — the connectors directory is available there too — and research tools (searching and viewing cases, statutes, and PACER) work fine.
However, the features that need a working file environment —
saving sources (fetch_opinion_file /
fetch_statute_file) and the citation-check skill — rely
on the desktop app or browser. For full functionality, use the desktop
app (Cowork) or a browser; treat mobile as read-and-research on the go.
Quick fixes
- A DingDuff “store” tool says it worked but no files appear → you likely need to turn on network access for Claude’s tools. See Troubleshooting.
- DingDuff doesn’t show up when you search the directory → see Troubleshooting — You can’t add DingDuff from the directory.
For everything else, see Troubleshooting.
2DingDuff with ChatGPT (Beta)+
⚠ DingDuff for ChatGPT is in beta. It works, but it’s newer and rougher than our Claude experience, which is our primary, fully-supported platform. If DingDuff is part of your daily workflow, we recommend Claude. Use these steps if you’d like DingDuff inside ChatGPT and are comfortable with a beta.
DingDuff is a legal-research connector: it links your ChatGPT to millions of court opinions, federal and state statutes and rules, and federal court filings (PACER), so you can do real legal research inside ChatGPT, with citations.
Before you start — you need three things
- A paid ChatGPT plan — ChatGPT Work works best. Adding a custom connector requires ChatGPT’s Developer mode, available on paid plans (Plus, Pro, Business, Enterprise, Edu). DingDuff works best in ChatGPT Work (the plan for teams/business) — it’s the smoothest experience and it’s what unlocks Skills. The free plan can’t add the connector.
- ChatGPT in a web browser. Developer mode is only available at chatgpt.com in a browser — not in the mobile app.
- A DingDuff login. Sign up at dingduff.com (click Sign Up) to create your account. DingDuff is for licensed attorneys (per the Terms of Service).
Step 1 — Turn on Developer mode
- Open ChatGPT in a web browser at chatgpt.com.
- Go to Settings, then Connectors (some accounts label this Apps & Connectors).
- Open Advanced settings and turn on Developer mode.
Step 2 — Add the DingDuff connector
- Still under Settings → Connectors, click Create (or the + / New connector button).
- Give it a name, e.g. DingDuff.
-
In the URL field, paste exactly:
https://app.dingduff.com/mcp-chatgpt/
Copy it exactly, including the ending/mcp-chatgpt/. This is a different address from the Claude connector — using the Claude URL here won’t work. - For authentication, choose OAuth.
- Click Create (or Connect).
Step 3 — Sign in to DingDuff
ChatGPT will send you to the DingDuff sign-in page. Enter the email and password for the DingDuff account you created at dingduff.com, and approve the connection.
Step 4 — About the “Disconnected” label (read this!)
After connecting, ChatGPT may show the connector as “Disconnected.”
This is normal and does NOT mean it’s broken. In ChatGPT’s developer mode, a connector often shows “Disconnected” simply because it isn’t being used at that exact moment — ChatGPT connects to it when it actually needs it during a chat. DingDuff still works.
So don’t keep removing and re-adding the connector trying to make it say “Connected.” Instead, just test it with a real question (next step).
Step 5 — Confirm it works
Start a new chat and ask ChatGPT to use DingDuff, for example: “Using the DingDuff connector, find recent Texas appellate cases on the economic loss rule and give me the citations.”
If ChatGPT runs DingDuff’s tools and comes back with cases and citations, you’re set — even if the connector still shows “Disconnected.”
What works in ChatGPT
The core research tools work well: searching and reading court opinions, statutes, and rules, and searching PACER.
A couple of DingDuff features are built specifically for Claude and won’t behave the same in ChatGPT — the interactive citation-check review panel and saving source files to a working folder. For those, use Claude.
Add DingDuff’s skills (optional)
DingDuff’s optional skills also work in ChatGPT. They’re the same skills described on Skills & Settings. Skills are a ChatGPT Work feature.
To add a skill:
- Download the skill file(s) from the Skills & Settings section.
-
A
.skillfile is just a zipped folder. If ChatGPT accepts the.skilldirectly, use it as-is; if it doesn’t, rename it to end in.zipand unzip it. - In the ChatGPT desktop app, open Skills, then choose Create → Upload from your computer and select the skill.
- Repeat for each skill you want.
Trouble?
- No “Developer mode” option → confirm you’re on a paid plan and using ChatGPT in a web browser (developer mode is web-only).
-
The sign-in page didn’t open → remove
the connector and add it again, making sure the URL is exactly
https://app.dingduff.com/mcp-chatgpt/. - It says “Disconnected” → that’s expected — see Step 4.
- ChatGPT won’t use DingDuff → ask it directly, e.g. “Use the DingDuff connector to …”, and approve the tools when prompted.
Still stuck? Email hello@dingduff.com.
3Browser Setup+
You can use DingDuff in a web browser at claude.ai / claude.com. The connector setup is the same as on the desktop app — follow Install DingDuff first. This page covers the one extra thing browsers need.
Recommendation: if you can install the Claude desktop app and use Cowork mode, do that instead — it’s the smoothest experience.
Turn on Claude’s code-execution environment (“virtual machine”)
Most DingDuff research tools work in the browser with no extra setup. But two kinds of work need Claude to have a sandboxed working environment:
-
Saving sources to files — the
fetch_opinion_fileandfetch_statute_filetools hand Claude time-limited download links, and Claude needs a working environment (with internet access) to actually fetch and save those files. -
The citation-check skill
(
dingduff-citation-check) — it runs a small python3 step locally in that environment.
How to enable it
- In Claude, open Settings → Capabilities.
- Turn on the setting that lets Claude run code and create files (commonly labeled “Code execution and file creation”).
- Turn on internet access for that environment — commonly labeled “Allow network egress.” Without this, downloads silently fail.
- Start a new chat afterward.
Verify
- Start a fresh chat with DingDuff connected.
-
Ask: “Use DingDuff to find one Texas Supreme Court opinion on
the economic loss rule, then save it to a file with
fetch_opinion_file.” - If the file is created and Claude can read it back, the environment is set up correctly.
What’s different from the desktop app
- The connector itself works the same — same directory listing, same sign-in.
- Plain research (search/view) works without the code-execution environment.
- File downloads and citation-checking require the code-execution environment above; on the desktop app’s Cowork mode this is already available.
4Team & Enterprise+
On Team and Enterprise Claude plans, connectors are often controlled by your organization. If your role doesn’t allow enabling connectors, an admin enables the DingDuff listing for the organization first, and then each member connects individually with their own DingDuff login.
How to tell this is your situation
- In the directory, the DingDuff card shows a Request button instead of a + / Connect button.
- DingDuff doesn’t appear in the directory for you even though a colleague has it.
- You see a message that the connector isn’t available for your organization or your role.
Ask for it with the Request button
On a Team plan, clicking Request on the DingDuff card sends it to your organization’s admins for review — the button then reads Requested while it’s pending. Claude shows you the outcome the next time you open the directory. That’s usually all you need to do.
What an admin needs to do (send them this)
Please enable the DingDuff connector for our organization:DingDuff is a free legal-research connector; each of us signs in with our own DingDuff account (dingduff.com), so there are no shared credentials.
- Go to Admin Settings → Connectors.
- Find DingDuff — it’s in Claude’s connectors directory, so there’s no URL to enter. If I’ve already requested it, it’s under Requested by your team at the top of the list; otherwise search the directory for it.
- Enable it for the organization.
- Make sure my role is allowed to use connectors (not “Blocked”).
Once the admin has enabled it, each member connects on their own
- Customize → Connectors (or Settings → Connectors).
- Find DingDuff and click Connect.
- Sign in with your DingDuff email and password (from dingduff.com).
If the connector connects but tools are blocked
On Enterprise plans, roles can allow a connector but restrict individual tools. If some DingDuff tools are missing or always blocked, ask your admin to set DingDuff’s tools to Always allow (or at least “Ask”) for your role, rather than Blocked.
Code execution & network access
DingDuff’s fetch_opinion_file /
fetch_statute_file tools and the citation-check skill need
Claude’s code-execution environment with internet access. On
Team/Enterprise plans this is often controlled centrally.
If your admin won’t (or can’t) enable those, you can still use DingDuff via the BYOK / API key (Legacy) path described in Install DingDuff.
Still stuck? See Troubleshooting, or email hello@dingduff.com.
5Troubleshooting+
Find the symptom that matches, then follow the fix. If a connector or capability change doesn’t seem to take effect, start a new chat — many settings only apply to new sessions.
Opinion/statute store tools don’t work (no files appear)
Symptom: You ask Claude to save cases or statutes with
fetch_opinion_file or fetch_statute_file. The tool
seems to run, but no files show up.
Cause: These tools return time-limited download links. Claude has to fetch those links using its code-execution environment, and that environment needs internet access.
Fix:
- Open Settings → Capabilities.
- Turn on Code execution and file creation.
- Turn on Allow network egress.
- Start a new chat.
- Retry the save.
You can’t add DingDuff from the directory
Symptom: You search the directory for DingDuff and there’s no add button — or the card shows Request, or DingDuff doesn’t appear at all.
Cause: You’re on a Team/Enterprise plan where your organization controls connectors, or you’re searching the wrong tab of the directory.
Fix:
- Make sure Connectors is selected in the directory’s left sidebar (it also lists Skills and Plugins, and the search only shows the selected kind).
- Try the listing link directly: the DingDuff listing ↗
- Card shows “Request”: click it — that sends DingDuff to your admins for approval. See Team & Enterprise.
- Team/Enterprise, nothing appears: an admin must enable it for the organization. See Team & Enterprise.
The sign-in window doesn’t open (OAuth/login)
Symptom: After adding DingDuff, no DingDuff sign-in page appears, or sign-in never completes.
Fix:
- Make sure you created a DingDuff account at dingduff.com first — connecting asks for that email and password.
- Allow popups for Claude, and disable ad/privacy blockers for the sign-in.
- Try a different browser, then re-add the connector.
DingDuff is connected, but Claude doesn’t use it
Symptom: DingDuff is in your connector list, but Claude answers legal questions without it.
Fix:
- In the chat, click the + (tools) control and make sure DingDuff is toggled on.
- In Customize → Connectors → DingDuff, set the tools to always allow (checkmark, not the hand).
- Tell Claude explicitly: “Use only the DingDuff database for this.”
It worked yesterday, now it asks me to sign in again
Cause: Sign-in sessions expire periodically (about an hour), which is normal.
Fix: Reconnect via Customize → Connectors → DingDuff → Connect and sign in again.
The citation-check skill won’t run
Cause: It needs (a) python3 available in the session
and (b) your source files saved locally first via
fetch_opinion_file / fetch_statute_file.
Fix:
- Use Cowork (desktop) or Claude Code, which provide python3.
- First save the cited opinions/statutes with the store tools, then run the cite-check.
- See Skills & Settings for install steps.
Still stuck: Email hello@dingduff.com with your plan type, whether you’re on the desktop app or a browser, the tool or step that failed, and any error text.
6Skills & Settings+
DingDuff works on its own, but these skills make it noticeably better. None are required, though Legal Research is one we’d strongly recommend — see below.
Install them all at once with our plugin
The easiest way to get the skills, and to stay on current versions, is the DingDuff plugin.
- In Claude, open Customize → the Plugins tab.
- Under Personal plugins, click + → Add marketplace → Add from a repository.
- Enter
https://github.com/DingDuff/dingduff-public. - Click Install on the DingDuff plugin.
Works in Cowork, the desktop app, and claude.ai in a browser. New
skill versions arrive through the marketplace, so you don’t have
to re-download files as we ship updates. In
Claude Code, use
/plugin marketplace add DingDuff/dingduff-public then
/plugin install dingduff@dingduff — the
/plugin menu also has an auto-update toggle for the
marketplace.
The skills
The skills are released under the
DingDuff Skills License 1.0. Use
them in your paid work without restriction, change them to suit your
practice, and keep everything you produce with them. The conditions
apply only if you pass a skill on to someone else. A copy of the
license ships inside every .skill file.
One skill for legal research generally: it finds, retrieves, reads, and validates the controlling cases, statutes, and regulations, maps the citation network and the statutory landscape, and confirms everything is still good law.
DingDuff works without it, but it works a lot better with it. This skill carries the research method and the bulk of our anti-hallucination instructions, which can’t be delivered through the connector itself. If you install only one, install this one.
Two-tier validation (new in v2.5). Every case gets a quick screen, and the cases your argument actually rests on get handed to the full Validity Check skill below. Claude weighs how load-bearing each case is against the cost of the deep check, then tells you which cases got which — a quick screen is a smoke test, not a verification, and the answer says so rather than letting the two look alike. If you want a particular case checked the hard way, just say so.
The reasoning engine. Frames the legal issues, synthesizes the governing rule from the cases and statutes you’ve gathered, analyzes the facts against the rule, organizes the proof (CRAC/CREAC), and deploys authority.
Before an argument rests on a case, confirms the case is still good law for the proposition you’re citing it for — a case gutted on one holding can be untouched on another. It traces the case’s appellate history, sweeps forward for opinions that overruled, limited, or questioned it, and checks the authorities the case itself leaned on. Returns a short verdict with its confidence and an explicit statement of what the check could not see. Claude runs it in a subagent, which is expected. Install it alongside Legal Research, which calls it automatically on the load-bearing cases it finds; you can also point it at one case yourself.
After you draft a memo (Markdown, Word, or Google Docs), verifies every citation against the opinion and statute files you saved plus any other source you supply. Runs entirely in your own session. Needs python3 (Cowork and Claude Code provide it).
Formats legal citations in practitioner / brief style. Rules follow The Indigo Book.
Install a single skill by hand
The plugin above is the easier path and covers every skill. If
you’d rather install just one, download its .skill
file, then upload it to Claude:
- Cowork (desktop): Customize (upper right) → Skills → upload the file.
- claude.ai (browser): Settings → Capabilities → Skills → upload the file.
- Claude Code (CLI): use the plugin instead — see above.
Skills installed this way don’t update themselves — you’d re-download the file when we ship a new version. That’s the main reason we point people at the plugin.
Recommended Claude settings
Always use DingDuff for legal research
Add a custom instruction:
- Open Profile → Instructions for Claude (in your general settings).
- Add something like: “When I ask a legal question, always use the DingDuff connector and rely only on the DingDuff database. Tell me the jurisdiction you searched and include citations.”
Turn off chat training (privacy)
In your Claude privacy settings, turn off the option that lets Claude train on your chats. Recommended for confidential legal work.
Tips for better results
- Use only the DingDuff database (so it doesn’t pull from the open web).
- Specify the jurisdiction you want cases or statutes from.
- Ask for citations in the answer.
7How Citation Checking Works+
DingDuff’s citation checker takes a piece of legal writing you’ve drafted, checks every citation in it against the actual source text, and opens a review panel where you — the attorney — give the final word on each one.
What it can check
Any legal writing that cites authority — a brief, motion,
memorandum, demand or opinion letter, or any block of text with
citations. Hand it your document as Markdown, Word
(.docx), Google Docs (downloaded as .docx),
or a text-based PDF.
It checks citations against:
-
Authorities you pulled from DingDuff —
opinions and statutes you saved with the
fetch_opinion_fileandfetch_statute_filetools. - Any source you supply yourself — a Restatement section, a case that isn’t in CourtListener, the opposing party’s brief, etc.
How it stays reliable
- Quotes are verified by code, not by the AI’s memory. Claude proposes the passage that supports each point, but a small program running in your own session then searches the real source file for that exact text. If the text isn’t there, it can’t be marked as supported. A made-up or misremembered quote can’t slip through as a verified highlight.
- It shows you the evidence, not just a verdict. For every citation you see the claim, the exact highlighted passage in the source, and your document side by side.
- You give the final verdict — and there are three. On each citation you mark it verified, needs attention (supported, but with a caveat you note), or rejected.
How it protects your privacy
- The checking itself is entirely local.
-
The interactive review panel passes your document and the cited
excerpts through the DingDuff server once — only as the
arguments needed to draw the panel — and they are never stored
or logged. If you’d rather nothing transit at all, the tool
also generates a standalone
review.htmlyou can open locally. - Sources you supply are handled locally.
How to use it
- Draft your document.
-
Save the sources it cites. Use
fetch_opinion_file/fetch_statute_filefor DingDuff authorities; for anything else, drop a text copy into your working folder. - Ask Claude to cite-check it (e.g., “cite-check this brief”).
- Review in the panel. Step through each citation, read the highlighted support, and mark it verified / needs attention / rejected.
- Revise if needed and re-run.
- Generate the audit log.
You’ll need python3 available (Cowork and Claude Code include it).
What it does not do
Citation checking confirms that a cited source actually contains the language and supports the point your draft relies on. It does not tell you whether an authority is still good law — use the research skills for that — and it doesn’t replace your professional judgment.